Wednesday, December 18, 2013

The Hay Rake table round up.


I had a lot of fun with this project. The joinery was challenging. (There will be a post-script on the stretcher joinery soon.) The fact that I built it without a table saw put an interesting twist on the process. Using the drawknife put a goofy grin on my face. I really liked the finished piece. And in the end, the client was happy with the end result, which is what's really important.

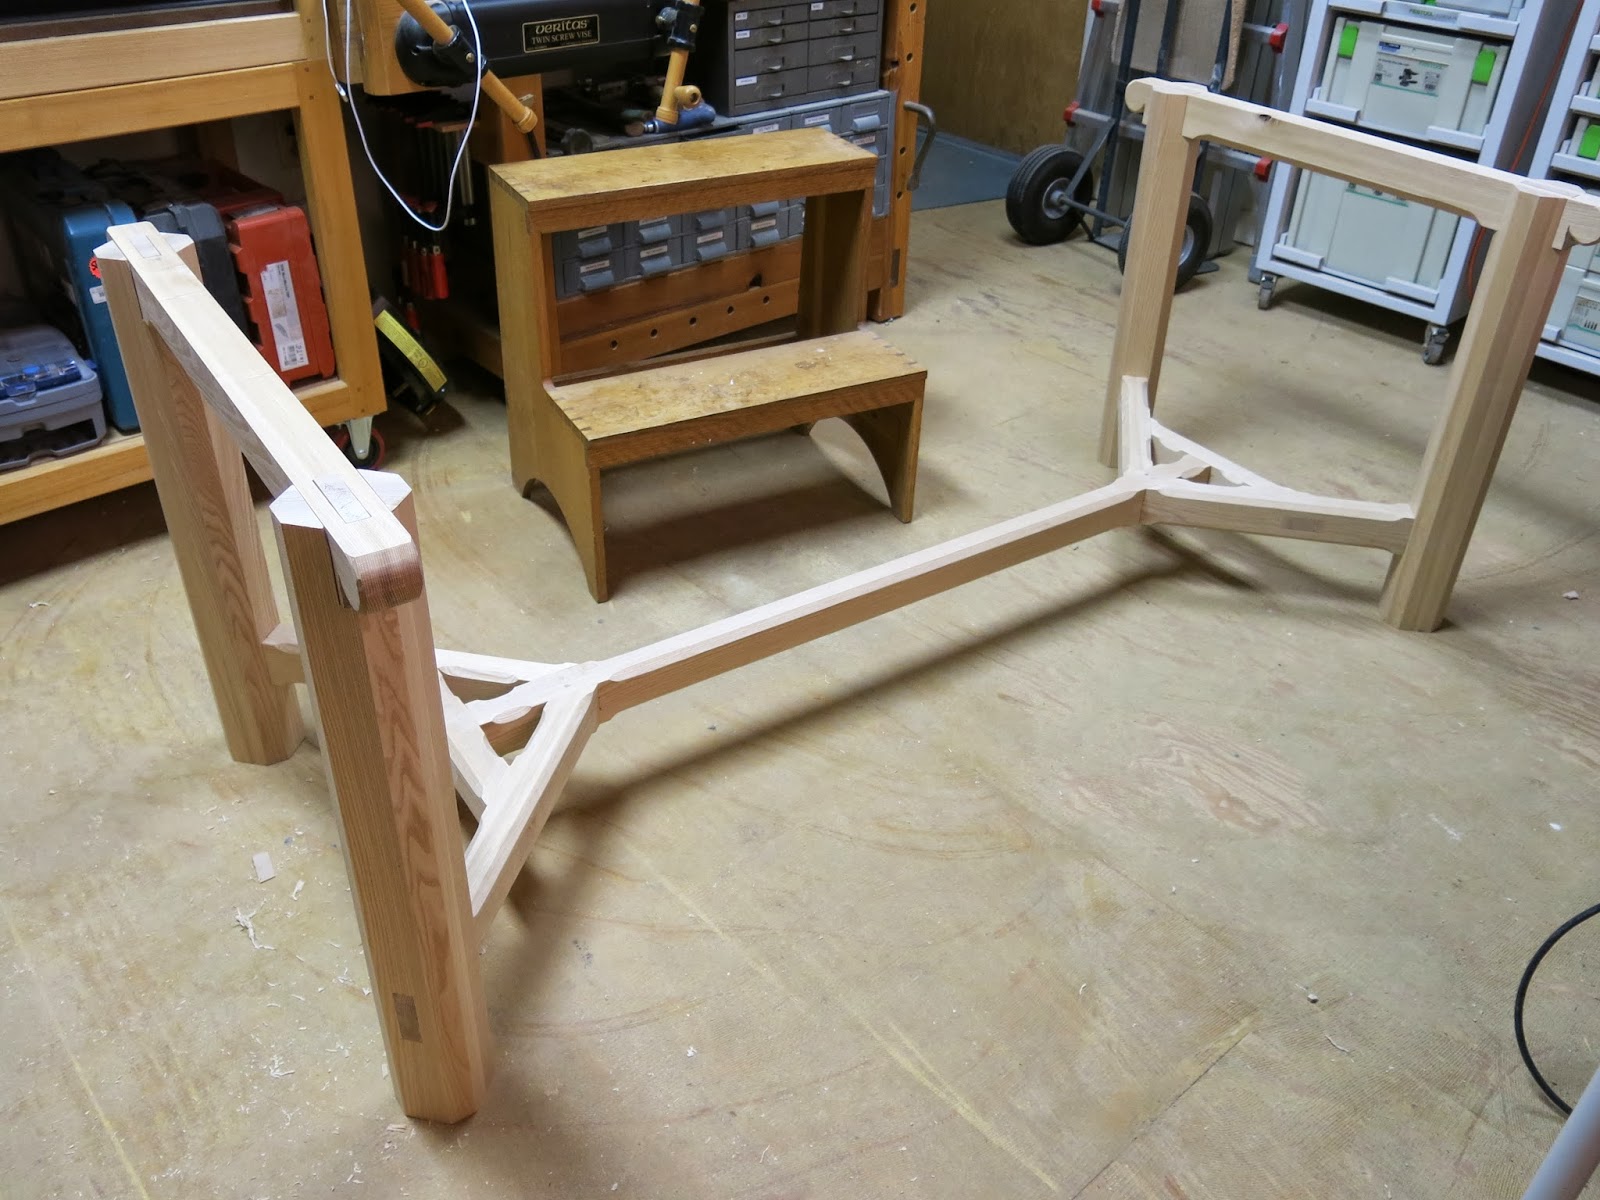
The structure of the base is very interconnected. Four pieces come together simultaneously at each end of the stretcher bar, and the resulting geometry determines the position of the legs. (I'll do a post script soon about how the joinery comes together.) The legs each have bridle joints cut into the top that capture the cross bars that support the table top. They also have tenons in the middle of each bridle joint that go through those cross bars, which locks everything together. The corresponding mortises have to be cut accurately, or they'll mess with the leg position, which will keep the stretcher joints from closing fully. Or, if the joints don't close, the legs won't join properly to the cross bars. Everything has the potential to mess up everything else. But when it all comes together properly, the resulting whole is a stout, strong piece of furniture.

Working with reclaimed lumber was interesting, and eye opening. It's pricey, and full of nails. That said, the aesthetics of the spruce caught me off guard. I don't normally go in for the rustic thing, but the boards were beefier than normal, from a pre- home center age. And they felt pretty dense for spruce. All of that, combined with the base, came together as a finished piece that really grabbed me. And I had to admit to the client that I didn't really want to give it to her. (I only admitted this once it was in her dining room... there's no sense in worrying people unnecessarily.)

I'm a big fan of Barnsley furniture to begin with, but the potential that his style represents for the way I want to work is impossible to ignore. The joinery is stout, but straightforward. The chamfering looks great, and is an opportunity to put hand tools efficiently to work in a way that embellishes the piece. I've been meaning to design more furniture anyway, but now I'm feeling a little more inspired to look into old timber framing and other stoutly designed structures for influences...

Working without a table saw: Making the top.


There's no real substitute for a powered jointer and planer when it comes to surfacing stock. But without a table saw, cross-cutting to length had to be done on the MFT, (easy) and cutting to width had to be done with the track saw as well. (Still easy, given the guide rail)


Since I was working with reclaimed lumber, I did the edge jointing and ripping with the track saw. And I'm incredibly grateful for that, too. The nails that I found embedded in the wood would have done no good to the jointer knives. And I'm not 100% that they would have played well with the SawStop, either. I know the saw looks for a drop in electrical charge, as it's absorbed into the human body, and I know that if I was actually touching one of those nails, that it would have set off the saw, for sure. Embedded nails? Not sure. Don't wanna find out, either.


So, really, the lesson of the day was to buy a hand-held metal detector for any future reclaimed wood projects. But also, yes, that you can do a lot with Festool that you'd normally want a table saw to do.

Once the nails were exposed, I was able to use a punch to drive them in, and edge joint the boards more properly. The track saw did a very good job, but a little more work was required to get the edges just so. In any event, getting the top glued up was pretty simple after the edge jointing.


Doing the breadboard ends wasn't too hard. I defined the shoulder of the end tenon with the track saw, set to the right depth of cut, and removed most of the waste with a router. I used the router table to run the groove in the end cap, and did a few other bits and pieces to get everything fitted up that way.

At this point in the project, I was 2 days away from delivery. (I delivered the table on the day before Thanksgiving) So, my emphasis was more on delivery than on documentation, so those details are, unfortunately, going to be left to the imagination.


Wednesday, December 11, 2013

It's ALIVE!

Just fired up the SawStop for the first time in the new shop.

Things just got real.

Oh, wait...

More real?

---

Dust collector also has power, but needs a drum, and some plumbing.

Thursday, December 5, 2013

Taming the savage knife, or, How I learned to stop worrying and love me some Cotswold furniture


The Cotswold school of furniture design, to which hay rake tables belong, was pioneered by Ernest Gimson and Sidney Barnsley. This particular style derives a lot of it's essence from the primitive utility of farm equipment: Wagons, rakes, and other items that are made to be functional, and durable. There's a lot of exposed joinery. Chamfers are used extensively on Cotswold furniture, as they were on farm implements and wagon parts. This was done both to reduce weight, and to keep square edges from getting damaged by the daily indignities of farming life.

William Morris wrote that furniture should be made of timber, not of walking sticks, and this is pretty much the unwritten motto of Sidney Barnsley's work in particular. I wouldn't park my truck on top of one of his tables, but I probably could. One of Barnsley's contemporary critics wrote that his furniture looked like the work of a savage. When you compare it to the work that came before; Queen Anne, Chippendale, Sheraton, etc, it certainly does. And the intellectual side of my brain understands that. But in my eye, whatever this furniture may be lacking in a refined veneer of dignity, it more than makes up for with an enthusiastic display of grounded strength, and competence. It's rustic, not primitive.

The photo up above is the Memorial Library at the Bedales School in Hampshire, England. It was designed by Gimson, built under the supervision of Barnsley, furnished by both men, and is listed as one of the Grade 1 listed buildings in the UK. It's completely unlike anything that was done over here by Frank Lloyd Wright or Charles and Henry Greene, but I think it has the same kind of unity to it that those architect/ designers were known for. And I can't decide, given the choice, if I'd rather visit this building, or one of the Blacker or Gamble houses.

Back to now.

---

Six years ago I took a class with Brian Boggs. Brian is one of the smartest woodworkers I've ever met, and seeing him go at it with a draw knife was a revelation. At the time, he'd been making chairs for 25 years, and when he worked, it looked like he could shape the wood more easily than some people can tie their shoes.

One of the things he said was that the last stroke of the tool is the most important. A draw knife, spokeshave, or other edge tool, used properly, will leave a burnished surface that you can't get any other way. How you get from raw wood to that last stroke doesn't matter... the surface that remains is what you see. That stuck with me, but it really came to mind when I started working on this table. Machines make neat work of the complicated joinery. But then the real fun begins of making the finished surfaces... including the extensive chamfering on the stretchers.


I went to visit Patrick Leach when the hay rake table was still on the drafting board. A draw knife was on one of his monthly tool lists, with a chamfer guide, and the guide really caught my eye. (I still have to tune up the knife I bought from Patrick. This draw knife was ready to go, so I swapped the chamfer guide over.) The guide has two sides, which is normal, but also has a keeper on top, to hold the setting when it gets moved or removed. I moved it around on the knife a fair amount, so that keeper bar helped a lot.


There was a learning curve. (In part because Patrick had clamped the guide onto the knife upside-down.) A draw knife is a pretty dynamic tool: It gives a lot of feedback, and responds best to adjustments made on the fly. And the guides are designed to function accordingly. They're not designed to turn the knife into a chamfer plane. But they do allow a more controlled introduction of the tool to the material, to make it easier to take thin, chamfer- width shavings with the knife. And they do limit the depth of cut, like a chamfer plane. After a while, I was roughing out with the bare side of the knife, and using the guide to take the last few strokes that would leave a nice, uniformly cut facet.


Once I started to get the hang of how the guide works, I also found that it could steer the knife into and through the stop-chamfers, too. The knife is a visceral tool to begin with, but this particular operation felt more instinctual than I'd've thought. It also made layout a lot easier. Initially, I'd drawn out the edges of each chamfer with pencil lines, and traced the curve of the stop chamfers with a fender washer.  But once I understood that the guide would help to shape the stop chamfers, as well as define the chamfer width, nothing more than a tick mark to indicate each end point was necessary. That was a huge time saver.

The more I read about hand tool methods, the more I'm starting to understand just how efficient they can be... and how much thought and effort had been put into making them more so. North Bennet gave me a solid grounding in the fundamentals of hand tool woodwork. But there's a big difference between cutting fine joinery in school, and doing daily battle with dead trees for a living. This particular setup gave me a good long glimpse into a world where push-button woodworking didn't exist... but neither did the time to reverently commune with the wood, or relish the shavings that spill slowly onto your basement floor. This is not the tool of a hobby woodworker.


I had a fair idea when I started the table that I would want to make more furniture like this. And I was right. I'm very handy when it comes to jiggery and precision machine work, and that's where I'll save a lot of my build time. But the opportunity to spend a few hours working and sweating with a draw knife isn't typical of a lot of the other work that I do, and the hand-hewn, burnished surface left behind by the knife isn't either. It's that last cut with the tool that Brian was talking about.

And, it's enjoyable. If I can build more furniture that's big and visceral, like these tables, I'll be a really happy guy. It's worth two weeks of dust and noise to get to a couple of hours of quiet, sweaty, focused work.


Tuesday, December 3, 2013

Using the French chair maker's vise on the hayrake table.


Using 80-20 for most of my jigs saved me a lot of time, but I still needed a fast way to cut shoulders on the 45 degree tenons. Given that it was only one table, it didn't make sense to me to spend a lot of time engineering a way to treat it like a production run. So, I used the French chair maker's vise that I built back in July of 2012:


It's really simple to use. The top surface is reference-flat. The material is clamped lightly in the vise, and the shoulder line is lined up with a gauge stick that's set to the height of the saw blade in a side-cutting saw that's also part of this arrangement. Once everything's in alignment, the material is clamped, and the saw cuts both shoulders to be in exactly the same plane. Clever, simple, efficient. Gotta love that...


 SO how accurately does it cut? Very accurately, as long as the gauge stick is right on, which is the current problem. As pretty as this picture is, I actually need to make a new gauge stick. The tenon sticks up above the vise, I'm actually cutting on the wrong side of the line. The joints all came together fine, but the tool should be working more accurately than this. (To be fair, the blade was pulled out farther than normal for these shoulders, so there may be some error introduced there, but even still... I need to give this some attention.)


Clean shoulders will make or break the look of a mortise and tenon joint, so they have to be done right. For this particular table, this was the most efficient way to get the job done that I could think of. For multiple tables, I might set up something on the table saw (if it was set up, which it's not, yet) or with router templates. But for one table, (8 angled joints) the chair maker's vise is such a quick and intuitive tool that it just made all the sense in the world to cut the shoulders that way.

Joinery's done... chamfers are next. 

Sunday, December 1, 2013

80-20, jiggery, and my foray into building a hay rake table


As I continue to unpack the shop, daily life and parenthood hurtles on in a mildly controllable fashion. Among other things, I had a commission for a hay rake table, made with reclaimed wood, and the client wanted it for Thanksgiving. That, and I still haven't had time to actually hook up the table saw and dust collector, so no table saw was used on this project. Given the need to work quickly, I decided to skip my normal habit of making 'serious' jigs, and worked with a few pieces of 80-20 aluminum that I'd recently unpacked.

If you're a push-button, store-bought jig woodworker, more T-track won't really help you much. If you've been building jigs for a while, and you need a fast way to make new jigs in a flexible way, this stuff is a game-changer. Yes, you can make any of these jigs with wood, MDF, plywood... but there's a lot more drilling, cutting, installing T-track, etc... and at the end of that exercise, you're the proud owner of a dedicated jig that will need periodic recalibration or rebuilding. That's a big investment in time, and an investment in materials that you won't get back. Building these jigs was fast. And when I was done building the table, the original extrusions were in exactly the same condition, and I can use them again for more jigs. THAT'S a big deal.

Fast, flexible, with minimal waste? And not having to break down sheet goods? Yeah, I'm impressed. And I can tell (gut feeling) that I'm just getting my feet wet right now.

Jigs need to position and hold the material in place, and in some cases guide the material past a cutter. Using nothing more than a few carriage bolts, a couple of Incra clamps, and some blocks of scrap wood, I was able to throw together some pretty decent production jigs in a very short amount of time.


Drill press fence for drilling out mortises in the legs. The fence is simply bolted to the table, (holding the plywood surface down, too) the block is held on with a simple 1/4-20 t-track bolt. (The oval-headed kind, not a hex bolt.)


 Stop fence for the band saw, for cutting tenon cheeks, and stopping at the shoulder line. Held onto the band saw fence with Incra clamps.


 Cross-cut fence, and stop fence, for cutting shoulders. I also used this setup for cutting parts to finish length, since some of them (like the legs) were just too big for the track saw to handle. The black extrusions have larger tracks, and use 5/16" carriage bolts.


 Support and stop for drilling out the 45 degree mortises in the stretcher assembly. Again, just bolted to the table. There were moments when I needed the Incra clamp to be moved back, so that I would have space to clamp the material to the extrusion with an F-clamp. Thankfully, there are 3 tracks in the faces of the aluminum, so moving that clamp was very easy. +1 for an easily modified jig...


Cutting the 45 degree mortises in the long stretcher. I did have to bolt on an extended L-shaped block, but it was a very easy thing to do. (By the way, these are the mortises I was working on when I started using the 3-pound hammer.)

As the deadline loomed larger, I quit stopping to take photos. But I also used the extrusions that hold my router table to mount a positioning block to adjust the router table fence more easily and accurately. More on that some other time...


Thursday, November 28, 2013

When in doubt, use a bigger hammer.


I love watching the videos from Richard Maguire. And I like reading his blog, too. He knows his business, and gets down to it, and there are no unnecessary frills or showmanship involved. Which is very cool, and feels a little novel, coming from the North American blogosphere sometimes. A while back, Richard wrote that he'd taken to using a lump hammer instead of a wooden mallet.

I've been paring a lot of angled mortises this week. I gave in to temptation the other day and grabbed the 3 pounder that I usually use for hitting a center punch, or other appropriate tasks, and started putting it to the back end of one of my wooden handled mortise chisels. I felt bad about it for a minute, and worried that I'd do some real damage, but then I thought about the math involved. When you hit the chisel, the energy that drives the chisel forward comes directly from the inertia of the whatever you're hitting it with. And the two factors that go into inertia are mass, and velocity. More mass equals more inertia... or, the same amount of inertia, but with less velocity.

You tap slowly and lightly with a much heavier hammer, and apply the same amount of force behind the chisel as you would by whaling away with a joiner's mallet. But the handle isn't going to receive the kind of shock load that you'd get from something that you have to swing much faster. It's a little counter-intuitive to me that a 3 pound sledge would be actually be gentler to my tools than a wooden mallet, but the more I think about it, it's probably true. And that's been Richard's experience, too: "I’ve broken several chisel handles with a wooden mallet and yet to break one with Lumpy." (Lumpy is his trusty lump hammer, that he's been using for years.) And while I can't really prove it one way or the other, I'm starting to feel like it's showing in the work, too... The chisel is being shoved rather than being blasted through the material, and it feels like a cleaner cut.

I will say to take your time and listen to the hammer if and when you use it... After the first day it felt like I had strained my bicep, because I was throwing the 3 pounder around like it was a lighter tool, jerking it around and shock loading my arm in the process. Using a hammer like that is not about power... It's about finesse, and letting the hammer move as it will. Once I got used to slower moves, it was a much more enjoyable experience. 


Thursday, November 21, 2013

Intro to the Festool MFT


At the heart of how they work, power tools are all more or less the same thing: A motor, a rotary shaft, and something that cuts in a rotary motion. The band saw and jig saw are notable exceptions, and the lathe is basically the same process, but backwards, spinning the work instead of the cutter. But regardless of whether it's a router, shaper, circ saw, table saw, chop saw, drill press, milling machine, bench grinder, horizontal slot mortiser, Festool domino, or surface grinder... it's all rotary motion. The primary difference is in how the work is held, and how the work and cutter are presented to each other. It's all about the shape of the cutter, and how you to present the material to the cutter. And presenting the material is what jigs are for.

There are three primary components in any jig that I can think of: The first is a way to position the material in the jig, the second is a way to secure the material in that position, and the third is a way to accurately guide the material and the cutter past each other. A failure in any of these three things results in bad work. If the material isn't properly aligned, the cut won't be either. If the material has room to move around, the cut will move around, too. And if the motion isn't rigidly directed, the cut won't necessarily travel along the intended path. Which brings me to the Festool MFT, a work table that's been really making me re-think a few things.


The surface is an MDF top that's been perforated with a grid of CNC-drilled, 20 mm holes. There are three main components: The table itself, which is covered in mounting points, the fence, which aligns the material, and the track, which guides a tool. (circ saw, router, jigsaw) The fence can be mounted vertically, or flat to the table. The track is held in position at both ends, by mounting points that are height adjustable, to accommodate a variety of stock. Basically, the MFT is a big, modular jig. The main difference between this, and other stationary tools, is that the material is fixed in place, and the tool is moving, instead of the other way around.

For those unfamiliar with the Festool track saw, the edge of the track is a strip of rubbery plastic that gets cut by the saw on the first pass. Because of this, the user can simply cut to a line by laying the rail down on that line, and using the saw. Using the fence, or some dogs, the user can accurately cut a quick 90 degree angle on the table without needing to lay out anything more than a quick pencil tick on the edge of the board, to indicate where the cut needs to be. If you need to make repeated cuts, the stop on the fence will serve.

In hand-tool terms, this set-up is not too far removed from a bench hook, or a shooting board.

That's the beginning. Enter the after-market parts.


The green things here are Qwas dogs. Steve Adams has been making these things for a couple of years now, after a lot of conversations that took place on the Festool Owner's Group forum. His methods of work evolved around using the holes in the top as a way to accurately align and position the work, as well as the major components of the table. Paul Marcel details some pretty straightforward ways to calibrate, or re-calibrate the table components on his blog, and on YouTube, using the Qwas dogs. There are also rail dogs and mini rail dogs, for positioning the fence, or guide rail, or other things, using nothing more than the holes in the table surface. The dogs themselves can also serve as quick-use guides in lieu of a fence, at 90 degrees to the guide rail, or 45, or a few other angles, as allowed by the hole pattern in the surface.

Because I'm using the MFT as an out-feed table, I don't want to have to set up the protractor head and stock fence every time I want to use it. So, I bought some of Steve's rail dogs to hold an alternate fence in place, made of a piece of 80/20 extrusion. So, rather than taking a lot of time setting everything up and calibrating, I can just drop the fence in place when I need it, and lift it off when I don't. In theory, with the rail dogs, you don't really need much more than a top with holes drilled in it, the saw track, and a fence.


Qwas rail dogs, and a chunk of 80/20 extrusion
The MFT excels at quick, one-shot cross-cutting, and repeatable production work. It's also much easier to calibrate, or re-calibrate, than my table saw sled. It won't handle rip cuts as well as the table saw does, but it may be the beginning of the end for my need to do cross-cuts on the table saw.

I have other ideas in mind besides just using it for cross-cuts. But that's a story for another day.

Tuesday, November 19, 2013

Mission Statement

I've added a page to the blog: Mission Statement for the shop. For those of you who are only passingly familiar with the term, a mission statement isn't a motto, it's a statement of purpose.

In Lawrence, the purpose of my shop changed a lot over time. Sometimes the shop was a learning space. Sometimes it was a productive space. Sometimes it was just a storage space, while I took side jobs to get through the recession... or while I was figuring out how to actually run a business. Sometimes it was just a place for me to stare out the window, philosophize, and decompress, while the Merrimack river slid slowly by. I never took the time to define the mission of the shop. Honestly, I'm not really sure I knew enough about how I wanted to work to be able to define it. I'd been out of school for a year and a half, it was my third shop, and I was still pretty scattered.

It was a 3500 square foot shop, shared between three people. There was a lot of room to do all of the above, without feeling constrained by square footage. There was a lot of room to collect equipment, materials, and scraps that I didn't, and wouldn't need. And so, I was able to amass so many things that I'd never be able to get to, that would never stop distracting me. It was too much room.

My new shop is smaller. I've had to streamline, and make a lot of decisions about what's important to the space, to me, and to the business. And that has meant some hard looks in the mirror. I started out as a hobbyist. After 10 years, I still want to learn, and to try as many new things as possible. But  I've learned the hard way that I need to keep the business healthy before I can afford to keep learning and doing new things.

Machines will play a bigger role in the new space, simply because they're faster. I can plan and execute complex designs that require a lot of hand work. And I love doing that kind of work. But after 5 years, it's become clear that the way I have to do things differently than I learned in school. I still want to keep my skills sharp, but I'm going to have to pick my battles on that front. Once the structural work on a piece is done, the process of adding the fine details... carving, inlay, hand planed surfaces, and so on... can begin. The more time I save with machines, the more time I have to add the little details that make such a difference. That won't always be a lot of time... but it'll be enjoyable all the same.


One side note... I have a feeling that I'll be consulting the esteemed Mr. Leach when it comes to new tools. I have a feeling that there are some old hand tools that were designed to be more productive and efficient than others. I also have a feeling that he knows which ones are which, and that he probably has things that I'd never even thought about... like the draw knife he sold me recently, with the chamfer guides that can hold a specific spacing. The ability to move the guides along the blade as sections of the blade get dull, without having to go through the process of setting up the spacing again.will be a time saver.

The other reason to focus on the machinery is that I enjoy the process of solving problems... and I'm good at it. I like coming up with jigs and fixtures, and evolving them to set up more easily or quickly, and to work more accurately. The end goal for me is two-fold:  to come up with a better piece of furniture for my client, and to give myself more time with my family. So my focus right now is on reducing lead times without sacrificing quality of construction. That's leading me towards building modular jigs, working with industrial aluminum extrusions, and figuring out what's most relevant in a jig or fixture when I use them.

So, that's where the shop is headed for now, and it's what you'll be seeing in the blog. I'm still going to wax poetic in here about craftsmanship, inspiration, the learning process, and so on. But I no longer have time in the shop to watch the river slide on by.


Thursday, November 14, 2013

Interesting hand tool/ Never would have guessed that one...


These belong to one of my shop-mates. I figured "Oh, yeah, drawknives... look like they're for scooping out chair seats."

Apparently one of his relatives worked in a slaughterhouse. These were actually used for breaking down swine.

Go figure.

(Mmmmmm... Bacon.)

Monday, November 11, 2013

Meeting Patrick Leach

The internet is a funny thing... you hear enough about someone, and you start to build a story in your head of what you imagine that person is like. I'd like to spin a tale about how the fireplace in Patrick Leach's smoky, timber framed banquet hall was burning a pile of transitional planes, while he sat in an old chair that topped a dragon's hoard of rare tools. Instead, it was a normal, well lit, tasteful home, and I really wouldn't have guessed anything about the vintage tool thing from looking around. He met me at the door, and had the draw knife I wanted (the reason I went in the first place) sitting on the kitchen counter when we walked in  I talked with him for a bit, he used to be a software engineer, (I think that's what he said... I know he left a tech career behind) and he was, by all indications, just a normal guy. I kept talking tools for a minute, and I'm sure he smelled that I wanted to see the treasure room. So, he invited me in, and I thought to myself "Ah HA! Into the hall of wonders we go!"

 I think I half-expected him to welcome me into a shining museum, and throw his arm out as he welcomed me into the vaults with a grandiose gesture. Instead, he brought me into a normal garage, with several stacks of tool-filled, cardboard banana boxes on one side. Bundles of hand saws were stuffed in between boxes on the storage shelves, a few plough planes were just sitting on top of piles, and an old glass cabinet was up against the wall, filled with molding planes. It was a pile-up, not a dragon's hoard. He was just trying to pack it all in, until he had time to organize or get it all sold, whichever came first.

"Email me if you need something. I probably have it, and probably know where it is. The basement is worse than this, and I still need to unpack the van from last weekend. Half the time I get stuff at auctions, and I buy up a pile to get one or two good things, but... look at it all. So, just ask."

He's a capitalist at heart, so it's all for sale. I asked him where it all came from. There's no secret, he said. It's just a lot of work. He spends a lot of time beating the bushes. That's when my dorky preconceptions finally crumbled. He's a guy with a cool job, but he's just a guy, it's just a job, and it's hard work. We talked for another 20 minutes or so about normal woodworker stuff: The decline of western civilization, entitled kids these days, working a trade versus going to college...

Bottom line, he was a really approachable, likeable guy, and a pleasure to do business with. My hand tool habit still needs to take a back seat pretty soon, so meeting Patrick is going to cause me nothing but trouble. Now I know where I'm going to look for new tools... even when I really don't need them.


Thursday, November 7, 2013

State of the shop

After spending the past two months moving and getting settled in, it feels weird to be productive. I'd gotten used to the ongoing futzing, fine tuning, moving things around, and being 'productive' in a not really productive way.

Clock cases are being built, and I just milled a pile of reclaimed wood for a dining table that's on an accelerated schedule. I'm wrapping up a repair on an antique chest of drawers that had suffered from both insect damage and a really shoddy repair,: The veneer had been pulled back, the rotted leg filled in with plaster, and re-veneered. I'd never heard of such a thing being done, though I'm sure it's more common than I'd like to think about. I have one more coat of varnish to wipe onto a table that's been almost done for way too long. And I have a couple of chairs that need to be re-caned... And none of that involves packing, unpacking, wiring, assembling... Though I do still have to get the table saw and cyclone fully wired up, and ductwork put together.

I haven't yet been ready to tackle the mission statement for the new space. Lawrence was a place of learning in many ways, but it never had a 'governing' anything. My relationship with the space, my business, and myself, shifted and evolved a lot over 5 years. And my commitment to woodworking shifted in a few different directions while I got my bearings. Likewise with regard to running it as a business, and reorganizing shop and mind to work more efficiently. But this new space just feels different. It feels like go-time.

I'm starting to accept the fact that hand tools are going to take a back seat in some ways, which is pretty normal for most professional shops. But I'm trying to keep them in the mix in an active way. And that's part of why I'm balking at the mission statement: I want to maintain a tactile, physical connection to the tools and the wood. But I also have to run the business in a way that makes sense. Put another way, the hand tools need to justify themselves, and that's a hard thing for me to look at head-on. I think the real issue is that I have a tendency sometimes to use them for the joy of using them, when I know that I should be doing something a different way to save time. I have some solid ideas on how I think I can maintain a balance that keeps me happy, but I need to take a hard look in the mirror first, and lay a few things down.

And that's been the theme lately. I've been unpacking just about every part of my shop, my business, and my relationship to both, and figuring out what I'm going to keep, and how to incorporate what's left. It's been really hard. But it's also something I knew would happen, and it's one of the reasons I ultimately chose to move into such a smaller space: growth only happens against resistance. And I need to continue to grow. That doesn't make it any easier to go through, but I'm grateful for the opportunities I have right now to do just that.


Tuesday, November 5, 2013

Stupidity? Check! (Or, a conversation with myself.)

I don't know what it is about me. My wife would probably (and accurately) say that I have a serious problem with asking for help. Once in a while, I get in far enough over my head that I don't have much choice... but there are times when that line is hard to find. I chalk some of it up to my army days, when BFFI was the order of the day. (Brute Force, and F*** Ignorance) You just grab, go, and get out of the way if it doesn't work out.

Last night, about 8:30 PM, I had finally assembled the new stand for the dust collector, and gotten the cyclone bolted on, with the 5hp Baldor motor on top, but the whole assembly was on its side. So, all that remained was to tilt the thing up.

It's getting late, there's no one around. Logic should have told me to let it ride, and get back to it on Wednesday. (I'm out today, home with the boy.) But, the whole thing was on its side, in front of someone's table saw, and I didn't want to leave it like that when I wasn't coming in the next day.

Common sense doesn't usually take part in these conversations. Usually, Common Sense sits back, has a drink, and assumes an expression that's equal parts insulted, concerned, amused, and curious about how this one's going to turn out. (My wife has a similar look, so I'm a little too familiar with it by now.)

My arms and aching back both agreed that "Uh, uh. No way, man. This is dumber than that other time, with that thing you did with that stuff. You know... like when you decided to move an entire shop by yourself, stationary equipment and all?"

And my Head and Ego looked at the lot of them, and decided that since I'd gotten the thing down off the wall of the old shop by myself, and had enough control of the situation to stop and take a photo...


...well, surely I could find a way to make it work this time, right?

(Note... anyone paying attention will observe that the heavy motor is NOT part of the assembly in the photo)

Well, the first problem was a lack of mounting points on which to hook the block and tackle. I tried using my Little Giant ladder, setting it up directly over the motor, and hooking the block and tackle up to the top of the ladder. Great plan, but then I realized that as the dust collector would (in theory) be coming up in an arc, pivoting on the two feet that were on the ground, that it might not work. It might actually tip the ladder sideways, and then everything would come crashing down. Then I realized that even if the ladder would get it up most of the way, without tipping, that I'd have to tip the dust collector the rest of the way up... which would tip the ladder over anyway, but at a fairly inopportune time for me.  Even Common Sense decided to take part in that conversation.

Well, not really. Common Sense looked at just how far I'd already Jerry-Rigged everything, and gave me the finger. That was the extent of the exchange.

I found an I-beam that was at enough of an angle that it might work... but it was too far away. So, I hooked a ratchet strap to the I-beam, and hooked the other end to the block and tackle. I took another look in Common Sense's direction, and got pretty much the same response, again. But Logic was on board just enough that I went ahead with it anyway.

I ran out of rope to pull, and the thing wasn't completely vertical. That meant me getting under a heavy thing, that was mostly up, but still a live load as far as Logic, Common Sense, and the block and tackle were concerned. And getting under a live load is one of those things that I've been told is even dumber than doing this kind of thing by yourself at night after everyone else has left.


Logic, Common Sense, my Head, and Ego, all agree on two things: Announcing that one has sounded the depths of one's own stupidity, and possibly found the bottom, is a dumb idea. And, that announcing the recorded depth is even worse. Maybe not as dumb as stepping under a live load at 9:30 when everyone else has left the building, but dumb nonetheless. So I'll simply stop the confessional here, and say that the dust collector is vertical.


Thursday, October 31, 2013

One month in the new shop.

I spent three hours tonight moving big pieces around, and coming to terms with just how much I want to get rid of, really. It's been a long process, and it's one I really couldn't have done successfully at my old shop... there was just too much space, and it was too easy to indulge myself when it came to not getting rid of things that I didn't actually need. I have 3 routers that I haven't used in years, that are almost new, and a few old planes that I never got around to tuning up. Bags of hardware, a locking doorknob set that was going to go into a huge door we had up in Lawrence, not to mention bench parts... There are a lot of bits and pieces, including 2 old library card catalogs that I was using to hold it all, in the base of a huge storage tower that I originally built to hold the pile of junk that I couldn't quite get rid of. Tonight it hit home that I just can't afford a hoarding habit, even if it only consumes 8 square feet of floor space. One of the projects on deck right now (and due by Thanksgiving... don't want to think about that...) is a hay rake dining table, and I need the real estate if I'm going to build something that big.

It's hard to draw the line sometimes, and decide that familiar things need to go for the good of the shop. That said, I was just reading one of my entries from September, that talked about how the shop needs a mission statement, and a dedicated focus on usefulness and productivity. That sentiment shines a bright light on my need to run a very lean shop... and not just because of space constraints.

On a separate note, I got to meet some of the other inhabitants the other day. There's a catwalk connecting us to the neighboring mill building, and that floor is also filled with woodworkers, with a lot of overall experience. I found out that there's another wood shop in that building that's been up and running for almost 30 years, too. I talked to the finishing guy who works on the second floor. He does some restoration, some refinishing, and was very excited to find out that I knew how to cane chairs. He has some work for me to do, it seems. And so on. When I moved out of Medford in 2008, I felt like my time there had been a failure. Moving out of Lawrence is bittersweet. It was a good shop. But even though it's smaller, the new place feels like it's going to give me more room to grow as a woodworker, and a small businessman.

-----

The wiring went in on Monday, though it's not yet hooked up to the table saw or dust collector. I ordered a stand for the dust collector, which should be here next week, and then I'll get that up and start worrying about ductwork. Not that there's much to worry about. Compared to the old shop...


...this one should be pretty easy.


Tuesday, October 29, 2013

Safe and Sound

This arrived yesterday.

Very Excited.

Saturday, October 26, 2013

Resolving issues of compatibility: Adding a cast iron router table to the SawStop.


The cast iron router table on my Delta Contractor Saw has been a big player, and a large part of that is due to the ability to use it in conjunction with the table saw fence. I've seen a lot of people put a router table into the extension wing on the right, but having it on the left side of the fence makes more sense to me from a feed-direction point of view: the cutters on the router bit will push the work against the fence, making for a predictable cut. That's especially good for running rabbets and dadoes. With the router table on the right, (in the extension wing) the router bit would potentially push the work away from the fence. Less good, I think.

Moving into the new shop meant giving up one of the table saws. The fate of the Delta is yet to be decided, but I had a second cast iron router table stashed away, so I decided to put it on the SawStop. But in order to do that, there were 2 main compatibility issues to be dealt with: First, the router table is 27", front to back, which will fit many table saw tops on the market. (including the SawStop Professional, and contractor saw.) But the SawStop Industrial saw (which is what I have) is 30", front to back, so there would be some gaps to fill. Second issue, none of the mounting holes for the stock table extension on the SawStop Industrial would line up with the mounting holes on the router table.

A flash of insight hit while I was planning the move, and so I started looking on eBay for some 80/20 profiles to fill the gaps. For those of you who are unfamiliar with 80/20, it's basically industrial T-track. Most of the Kreg, Woodpeckers, Jessem, and Incra stuff in the woodworking glossy pages these days are tinkertoys by comparison. So, off I went to eBay, and what do you know... the profile I wanted even came in Black. Batman would be happy. And, it matches the color of the saw. I'm really not that fussy, function is more important, but the option was there, so I took it. Most importantly, the 80/20 profiles give me the option to mount router table fences or jigs in a very robust way.


To bolt the router table up, I would need to drill and tap some holes in both the router table, and in the saw table: some to bolt the router table to the aluminum profiles, and some to bolt that whole sub-assembly to the table saw. I've done this kind of thing before, and cast iron is pretty forgiving to work with. It's soft-ish, and drills and taps very smoothly. So, I did some head scratching, and made a layout block from a scrap of the profile, to be used with a transfer punch.


In the above shot, I'm actually laying out holes for alignment pins, to help align the table during installation. They also helped hold the weight of the whole thing while I was bolting it up. Holding up 40-odd pounds of cast iron, in alignment, while futzing with a socket wrench, is not fun. The pins made it easier. Installing the pins:


I used a doweling jig to lay out and drill pilot holes in the table top, and tapped them by hand:


The assembled saw... Router table installed, fence bolted on, and the whole thing leveled out to be co-planar with the Festool MFT, with a leveling base that I fabricated this week. At some point in the near future, I'm going to build a bridging piece to go between the saw table and the MFT, to complete the out-feed surface. That piece will have grooves for a miter sled, the MFT will not.


I've gone back and forth on whether or not to make a more solid, leveling base to support the MFT in a folded configuration. My decision was ultimately came down to this: If I need the extra space for any reason, the MFT can be folded up and moved out of the way, but a more permanent base can't be. I'll invest in the diagonal supports for the MFT legs to stabilize it a little bit, but basically, this is my working setup.


Sunday, October 20, 2013

...And, Into the new. (Tour of the new space)


This is a quick rundown of how the space has shaken out so far. My area here is not a full, standalone shop. I'm sharing a fully equipped machine room, with 4 other woodworkers. We all have our own work areas, and our own table saws in those respective areas. A few of the large pieces of equipment that I pulled out of the old shop would have been redundant, so they're on pallets in another part of the building.


Central to the space is the table saw, with a Festool MFT work table sitting behind it to serve double duty as a work table, and as an outfeed table. The MFT was a new purchase when I moved in, but the potential I see in it has had my head buzzing now for weeks. More on that in a future post, and on why I won't carve it up to clear table saw sled rails.

I also have plans to mount a cast iron router table to the SawStop sometime in the near future. That's going to be a project, since the two components won't simply bolt together. I'll explain that one when I get there.


Festool storage and long-term lumber storage is on the right hand wall. I don't like a lot of long-term storage in my work space, but it had to go somewhere, and since it's up and out of the way on the wall, it's not such a concern.


I already have a reputation in the building, for having so much Festool equipment. I don't mind.


Looking out from the back corner... the stub wall that comes out from the windows is going to be the designated area for short-term storage for project materials. The big storage tower was there for a while, but it didn't make sense to me for workflow reasons. I want materials to come into short term storage, flow over and past the table saw and MFT as they're processed, and move from there to the big bench for detail work. Sub assemblies will flow back to the short term area for assembly, and fully assembled projects will flow right back out of the entrance to the space.

That's the theory, anyway.  I want to map all of this out in a future entry, and explain some of my logic.

(Side note: There's a separate area for doing finish work downstairs, with a fully set up spray booth, so I won't be doing finish work up here.)


Back in the corner, you can see that my office is directly behind the work area. (I share the office with one of the shop-mates.) I've been wanting a separate area to do admin and design work for a while, as well as a place to pull out of what I'm doing to regroup when projects get stuck. Taking a moment has been problematic in the past, because it's so easy to get side-tracked by something else in the shop. Having a quiet office that's close to, but separate from the work flow will be a relief, and should help me focus more.