Tuesday, February 25, 2014

Working out a better miter bar... V.1


I've said before that jigs need three things: A good way to position the stock in alignment, a good way to hold it in alignment, and an accurate way to guide the stock past the cutter.

I've been generally frustrated with store bought miter bars for use in jigs. They suck. Period. And the reason that's such a problem is that they're the foundation for any jig you'll make. Any effort you put into making accurate fences, or solid work holding, will be undermined by the fact that you can't move the jig past the cutter in a way that's accurate enough.

There's a basic problem that manufacturers have: they don't know the exact width of YOUR miter slot. Most are 3/4". But that's ballpark, and subject to error. The only solution accessory manufacturers have is, make sure your error margin is greater. So, stock bars, like the one in the photo, are generally shy by a full 1/64". Longer bars will theoretically reduce the slop in the angle, but they still aren't great. And the goofy plastic shimming measures all share a common problem: They're plastic, and subject to wear from use, or damage from day to day bounces in and out of a machined cast iron surface. The end result is that there's a decent chance that, even with a ridiculously accurate miter gauge or sled, when the stars (and plastic afterthoughts) aren't in rare alignment, your joints will have gaps that don't need to be there. 

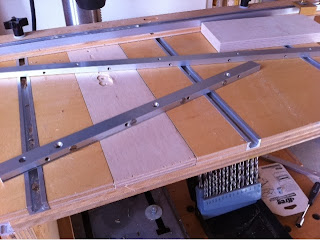
This is a chunk of Kreg bar, drilled, tapped, and countersunk for steel screws. The tap I used was chosen because it's worn, so the threads are a little snug. That way they'll hold an adjustment better. There's zero slop in the miter track, now that it's properly adjusted. It's not my ideal solution, but it's miles ahead of what I had to work with before.
Sunday, February 23, 2014

Shooting board for truing long miter joints


Project X requires long miter joints to make up vertical members. The longest is 52" long. And that's a lot of room for error. So, I built this shooting board to true the joints before gluing up.

Setting up... In this picture, there are small offcuts to the right of the part to be trimmed. Those are there to balance out the board that will be clamped on top to guide the plane. There's also an end stop.


With the upper guide board on top... The board needs to be aligned with the lower track before being clamped into place. Being me, I tried to think up a way that would do this more automatically and precisely, but this was the simplest and most practical way to move forwards.


Trimming the beveled edge. With a properly set chip breaker, grain direction isn't really much of an issue. Popular Woodworking will be running an article in their April issue on how to do that.


Shop tip: The finished surface will come to a delicate edge. Laying the boards flat on the bench, or out of the way on an accessory table, with this edge down, will help keep them from getting damaged. And, don't do this until the step just before glue up, so you don't have to worry about moving them around the shop. The less you have to handle wood with a sharp 45 degree edge, the less you'll expose it to getting beaten up.


The finished joint... is as close to perfect as I can get. (Picture of the dry fit)


Wednesday, February 19, 2014

80-20 to the rescue, again.


I'm about to do a lamination where 2 pieces will be laminated around a third, sharing a mitered edge. Problem is, the wood is very, very slightly bowed. The lamination will fix that, but getting a clean beveled edge on bowed stock with the table saw is... Dicey, at best. So, each beveled edge will be rough cut, and then I'll use a long shooting board to true the bevels. But, that requires that the shooting board has a reference-straight edge to start with. For whatever reason, this particular piece of plywood is out of straight by a bit. So, I'm using a chunk of 80/20 extrusion to pattern-rout a straight edge.

That's one thing I love about these extrusions. They're not technically machinist-straight-edge-reference straight... But they're close enough for woodworking. And this 7' piece was much cheaper than a certified straight edge of similar length. Great for, say, checking an 8' bench surface when you're flattening. 

AND, it's straight enough to use as a pattern, for trimming a reference edge on a jig. But, Please note the tape on the bearing: The edges on the router bit are almost, but not quite, in line with the diameter of the bearing. So I added tape until I was comfortable that the bit wouldn't touch my aluminum straight edge.


Friday, February 14, 2014

Shooting miters

It's always a good day when I get to break out the hand tools. Project X has a lot of miter joints, and as I get into the funky parts (can't wait) there will be some 3-way miters, too.  So, I made some miter shooting boards, and got to work on the miters. (The 3-way miters will require an interesting twist on a shooting board, but one thing at a time.)

One thing I really, really wish I could find was a miter bar that didn't have any slop. The miter sled I've made for the table saw gets the joints to be really, really close, but not quite 45 degrees. The fences are right on the money, but the store-bought miter bar is one of the 'adjustable' variety that are good for a while, but not really reliable in a long-term sort of way. I've seen some with expanding plastic washers (Incra) and some with plastic set screws (Kreg) but what I have in mind is something that I'm probably going to have to fabricate myself. Anyway, for now, I have to adjust the miters the old-fashioned way. Not that it's really a problem.

To save time, I tried making shooting boards with no track, just a mitered piece of MDF, where the plane just rides the outside. I've taken a similar approach when shooting joints on veneer, for a parquet surface, but I hadn't tried it with solid wood. What  I've discovered is that they're just too much work this way. You have to push the plane through the wood, while also holding it tight against the shooting board, in a way you don't have to with veneer. It works, but it's a lot more effort... next go around, I'll use a track that captures the plane. 


Wednesday, February 12, 2014

Quote of the day

As quoted to me by a client:

"Art without engineering is dreaming. Engineering without art is calculation."

Tuesday, February 11, 2014

Funny little things...


I've always been entertained by funny little solutions that people come up with to solve simple problems. Napkins under cafe table legs, and other little shims and plugs made of everyday items. "That coat button just fit there, and now it sits perfectly." And so on.

The bolt head for adjusting my router table sits in a recess that is perpetually filling with dust. There's really nothing for it, the bolt head needs to be recessed, and router tables generate dust. But when the router's running, and I have a dust mask on, it's hard to blow the dust out, to make room for the wrench so I can make an adjustment. And so I jam the wrench in anyway, pack down the dust, and clean it out later.

Today I found the perfect dust plug.


Friday, February 7, 2014

Get Woodworking Week: First tools, Sharpening, and Good Enough.

After 3 years in specialty woodworking retail, (I worked at Rockler for a year, and Woodcraft for two more years) this became my most frequent recommendation: DON'T BUY PREMIUM STEEL IF YOU'RE A BEGINNER. For your first set of chisels, I always recommended Marples Blue Chip chisels, precisely because they're a little bit soft. I know that this flies in the face of most internet hand-wringing and one-upmanship when it comes to tool acquisition. But I've seen fellow North Bennet students do museum quality work with these 'humble' tools. Most of us started school with Blue Chips. And many finished school with them, too.

My logic on this is simple: If you want to learn anything, you need to practice. The blue chip chisels will take a good edge, but they're soft, and you'll need to resharpen pretty regularly. That will help with the ability to develop muscle memory. And you'll get to experience how the chisels hold up on a frequent basis, which is equally important. Knowing how your edges are performing will teach you a lot about how well you're sharpening, or how well you're choosing your bevel angles. You'll know when you're getting it right, or you'll know more quickly that you're not. And the tricks you'll learn that will really help with edge retention will stand out more on a softer chisel:  For example, I was chopping dovetails in white oak one day, and started keeping a strop with me at the bench. I used it a lot. I use it way more than common wisdom would have allowed: Over-use will 'dub' the edge. (steepen the actual sharpening angle at the edge, and potentially round it over a bit.) But this dubbed edge was actually holding up a lot better against the oak. It sharpened out quickly later on, but while I was working, that very small, steep micro-bevel made all the difference.

When you're just starting out, high edge retention can be an academic point... or an inhibitor to growth. And if you're not that great at sharpening yet, AND if it takes a long time to get those fancy steels to be 'just so,' then you're more likely to avoid sharpening than to practice it. Konrad Sauer decided to stick with high carbon steel for his planes for just that reason: Exotic steels took too long, and he noticed that he was avoiding sharpening, even when he KNEW that he needed to. Because good old high carbon steel was easier and faster to sharpen, he was more likely to take the 2 minutes, and as a result, his planes stayed sharper.

Sharpening is not an end in itself: The point of making an edge is to use it. And that brings me to my final point, and it's a critical one for a beginner: Your edges don't have to be perfect. Get them as good as you can, or as good as you have patience for, within a reasonable allowance of time or effort. You're going to need to sharpen them again, and again, for as long as you continue to use them. And therein lies the rub. The more you work, the more you'll sharpen. The more you sharpen, the better your edges will be. And the better your edges are, the better your work will be.

You'll get better with MORE practice, not less. And you'll get that practice with tools that require it. It's ironic that the tools that you'll learn the most with cost less, because the lessons you'll learn are worth much more than the money you'll save.

Tuesday, February 4, 2014

Shop tip: Drill Press Blocks


Reaching around and behind the drill press table to crank it up and down can feel really tedious if you just want to drill a quick hole. I've started keeping scrap pieces of plywood next to the drill press to elevate the 'surface' in a time expedient manner.

This is also convenient if you need to keep swapping out long and short bits, like when you're drilling and countersinking.

If you need to use the fence for multiple precision holes, or need to clamp the piece down while you work with Mongo the 4" Forstner bit, you should set things up appropriately, obviously. But for the rest of those one-shot jobs, this will make it faster and easier.