Sunday, January 30, 2011

State of the Shop Pt II: The home front.


As I mentioned recently, I've been able to start working at home again on small projects. This afternoon I took a better stock of the work area at home and cleaned it up a bit. I have a few ideas on what I need to do to make it a more useful/organized work space, but for now, it's looking and functioning a lot better already.

In the near future, to help keep the area a lot neater, I plan on spending some time making a small assembly table with a cabinet, or something like that, to hold the host of small tools and parts and junk that I've hidden around the corner from view. For now, the piles are fine, they're not in the way, but I do think that having an assembly table in addition to more storage space will be a huge help in keeping the bench clear.

Today, I glued up a drawer. It's my first glue-up in this space, so it feels like a landmark. A small one, but it's reassuring to know that my love for working with wood has finally found a place in my home. That said, it's been a while since I've cut dovetails by hand, let alone glued up a drawer, and it's a good thing I'm getting the practice in. It will be a serviceable drawer, but it's not my finest work. Fitting the drawer into the case was fun, too... It took me almost 10 minutes to figure out why it wouldn't go in. There were still drops of glue in the corners of the case from when I glued up the case almost 2 years ago.

Really long term, I still have a pretty clear memory of the bench I'd originally envisioned building for the space, with a base that was completely filled with drawers, like a shaker workbench. I'm not going to build another bench, but it would be nice to build a cabinet/drawer unit that fits snugly in the frame of this bench. I love the little tool chest that I have in the bench right now, but it just doesn't have the storage space I want.

Lust for more storage space aside, I also have a pretty clear memory of why I wanted a bench at home in the first place. I like writing about woodworking, and I like figuring out how to refine the process. I have a few ideas for bench fixtures that I'd like to put together to help streamline the process of building furniture at home. The ultimate goal is to help people who are working with limited space figure out how to work better, and more efficiently, with the space they do have.

It's funny, in a way. I spend 5 days a week in the shop, working on projects for other people. I spend Saturdays up there, too, doing small personal projects, maintenance, and little stuff. I'm spending 5 days a week in the shop trying to make it pay, I spend Saturdays trying to keep it fun... and I'm still excited about doing bench work at home on Sunday afternoons.


State of the Shop

For various reasons, I've always been kinda focused on the hand tool end of the shop, and I noticed when I was going through old posts, that I almost never put up any pictures of what happens on the other side of the double doors, or what it looks like. While I'm still pretty focused on the bench room, I've been paying a lot more attention to how things are working in the machine room lately, so it seemed apropos to do a quick tour of the machine room. I'm tagging this one under Shop Improvements because it's a good snapshot of where things are right now.

Here's a then versus now comparison from one angle. The first is when we had just redone the floors. The next one is what the place looks like now. The big green Wadkin planer in the background was moved back when we did the floor, which is why the dust collection pipe looks like it's just hanging in mid-air... it is.

Since then the rest of it came in. In the foreground in the second picture is the enormous sliding table Oliver table saw. That thing gives me the willies... I use it when I need to. I stick with the SawStop when I can. Now that the contractor saw is set up, I may use that from time to time, but so far it's predominantly been used as a router table station.

This is a shot from another angle, to give a better idea of where we get to work on a regular basis. The big island to the left has the Oliver at one corner, and the Sawstop at the far corner. The contractor saw is in the foreground, next to the Powermatic 14", and the Laguna 18" band saws. Just to the left, and out of frame is the Yates American 36" bandsaw. It's a beast. There's more to the machine room, but I don't want to feel like I'm showing off any more than I already am.

My favorite part of the shop right now is that I'm actually up there on a daily basis, working on a paying job. That's a welcome change from the struggle that's been the past couple of years. Monday through Friday I do the paying work. Saturdays are reserved for small personal projects and maintenance type things, like the contractor saw project which is finally wrapped up and done. One of the next Saturday projects is going to involve making up a bunch of drawer slips for my hand tool project at home. Following that I'll begin phased construction on the big cutting table I mentioned recently. I specify phased construction because I learned very my lesson on the contractor saw project: Plan single-day sized chunks. That project turned into a 3 day thing once I kicked it off, and while I don't regret getting it done, I did feel like I had less control over my time due to the way I (hadn't) planned it out.

Thursday, January 27, 2011

A couple of small things...

-Thanks to the :30 log (writing up what I've gotten done, every half hour), I got to sit down the other day and actually calculate how much of my shop time has been going to getting jobs done, versus maintenance, futzing with jigs, slacking off, etc. And I was able to see just how much of my time has been productive. So, the log is bearing fruit. Bitter fruit, but it's a place to start.

-Other small jobs are starting to roll in. More as it happens.

-I recently went through the past couple of years of blog entries, and reworked some of the labels, consolidating similar topics under one heading. I also set up labels as a field on the main page of the blog, so it's easier to navigate in here. 

One of the new labels is "Shop Improvements." This will basically chart the progress of the shop in Lawrence from conception to now, all the little and big things that have been put up or in by KPW. It's an entertaining diversion if nothing else. 

One of the other labels is 'Home Shop.' Now that Ariel is moving past the trauma of last semester, her issues with me doing work at home seem to have waned. (Well, aside from working at 11... but that sounds like a constraint I can live with.) So, with luck, there will be home projects coming up soon that are worth writing about.

It's a hand warmer!

So, I've gotten remarks from various people on the shape of these mugs. Yes, they're weird.

But they're great for warming the hands on cold days!

(Note that both of my hands are actually in the picture. To take this shot, I had the Emmert vise rotated 90 degrees, to hold my iPhone high enough to take the picture... and touched the screen with my nose.)

Monday, January 24, 2011

Strange things are happening...

Three years into this whole small business thing, and a slew of supporting side jobs later, I've started to understand something... the challenge of being your own boss is that you actually have to be the boss... and that this isn't as freeing as it sounds.

For the past 3 weeks or so I've been following the advice of a book I've been reading, that said to stop every  30 minutes to log down what you just did. I've been doing that. It's been a little disheartening, because there were days when I forgot to do it, or days that I've been home in the middle of yet another snowstorm. But tonight I transcribed some of what I had logged down, and broke down just how much work I've actually been getting done while I'm in the shop.

Even on days when I've been actively doing something for a solid 9 hour day, it looks like I'm generally able to focus solidly on the job at hand for about 50% of the hours that I'm putting in on some days. Some of the rest of that time is going to organizational stuff like coming up with a checklist of what to do next, do I don't have to think while I'm at the table saw. (I find that trying to simultaneously plan and execute a project leads to a diminished ability to do either one well.) But there are other times where I spin off completely and feel the need to do on the spot maintenance, repair, or refinement of a machine or process, or construction of a jig that I need to do whatever it is...  and almost immediately I lose anywhere from 30 minutes to an hour and a half.

Typically, times like these are when a good boss is needed, to grab you by the collar, call you something unprintable, and tell you to get the F!!! back to work. But since I'm self employed, I need to be my own boss. And after a few weeks of charting where my time goes, I'm pretty sure that my employee needs to be grabbed by the collar a little more often.

It's an evolving process, but I felt the need to share.

Thursday, January 20, 2011

The shape of things to come

So, I'm still tweaking the latest in what has been a long, slow series of shop setups. But it's getting there. It seems that I keep having to remind myself that open space is a good thing.

Anyway, four main things have changed, or are in the process of changing.

First, I dismantled the lab table that has been set up in various ways since I opened up my first shop in Medford. Originally, the table was purchased by the now defunct leglab at MIT, and came to me eventually via craigslist. I thought that this was really cool, and was hoping that some of that hard working smart kid karma would come with the table. It didn't. Or at least, it hasn't manifested itself yet. Since the table was such a reliable crap-catcher, and I'm trying to minimize the piles, I decided that the table simply wasn't doing what I needed. I unbolted the legs, and stored the whole thing in the lumber area.

Second, I moved the huge wall cabinet away from the corner.

With the space by the window cleared out, I had room to move my big workbench over to the biggest source of natural light. I need to do something about artificial light, so I can see better when the sun goes down, but the improvement overall in the space was HUGE.


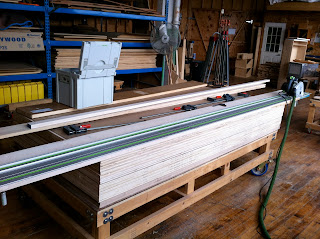
When the big pile of plywood isn't there, the entire floor space is pretty much wide open. Irony of ironies, I cleared the space in order to make room for a huge cutting/assembly table that I'm planning to build soon. The inspiration and rough design comes from a guy named Steve Jones, over on the Festool Owner's Group message boards. And since I'm coming to terms with the fact that some of my incoming work is going to involve plywood, I think it's a great idea. So, while the big cart covered in plywood is taking up all of my newly reclaimed space, the cutting/assembly table is going to be about the same size, if a few inches shorter. It'll also have a lot of storage space underneath, for a few things that still haven't managed to find reliable homes... like the case for my Festool Drill, a few other Festool things, some bins for screws and the like, and I'm thinking I'll find a way to incorporate a vacuum press in there somewhere.

I still have a lot of crap to clear out. But I feel like I'm making slow, steady progress. (Fingers crossed.)

Shop tips 1/20/11

This is the first entry of what will hopefully become an ongoing, but probably not regular segment on things I find that help with productivity.

Reliably repeatable crosscutting of long parts.
I was trying to find a way to cut long parts for some frame and panel sub-assemblies the other day. I have a long fence that hooks onto a miter gauge, but the parts were even longer than that. The solution that I came up with was to use the long bar to the right of the blade, and set the length of the part with the table saw fence. Since this is an inherently dangerous operation, I needed a way to use the fence to set the length, and then have the fence slide out of the way. But I had 8 of those parts to cut, and only felt comfortable cutting one at a time. And I wanted a precise way to position the fence.

I have a length of T-track set into the extension table, which I put in there to hold fence settings, in the event that I needed to cut something smaller, and then go back to the other setting. I switched that up a bit, using the setting holder as a stop for bringing the fence back the same position again and again.


Another use for the pattern vise
I've been seriously loving the Emmert vise. Oh, man, so worth having.

I was using my Festool domino to join the frame and panel assemblies together yesterday. I'm used to clamping every piece to the bench top, and un-clamping every time the part needed to be moved or flipped... sometimes having to use 2 or 3 clamps on the longer boards. Then I remembered that the Emmert pivots 90 degrees. I feel like a tool glutton. I'm in hog heaven. Using the vise is SO much easier than using clamps.


Accurately edge jointing really long boards
I'm not sure if this is really a helpful post, or if it's just me showing off some of my coolest toys tools.

In any event, this was the easiest method to straighten a 12' long board that I've ever used. I love Festool.

Finished Contractor saw station, and adjustability versus custom fit.

So, I mentioned this setup in the last post. And here it is.

Front to back, this is now a shorter, more normal sized station to work at. It's also currently the only remaining router table that's set up in the shop space, so that's something I'm going to have to remedy soon. Before this re-work, there were 2 router tables built into this station. Ironically enough, there was only one that was actually usable with the fence we had mounted up, so I guess this isn't really such a change in status, but I still want to have more than one router table station, since there are three guys who use this shop.

I had to build the extension wing to replace the router table that had been there previously, so I made it out of some scrap plywood that we had lying around, and some extruded T-track and miter slot stock. The T-track is in there to use with a jig that helps hold fence settings. The miter track is there in case I feel the need to build a sled for cutting long parts. I've had the idea in the past, but never followed up on it... I figured this was the time to lay the groundwork for that project. 

Re-assembling the contractor saw also reinforced the philosophy that I was taught in school, which is basically that most tools, as they are out of the box, are still basically kits for something better. In this case, the whole fence assembly basically mounts to the table saw with two oversize holes. They provide a lot of slop for the fence to be adjusted around, and aligned with the surface of the saw. Realistically speaking, the extension wing would be drilled by hand to provide mounting holes that would line up with the bracket that bolts up to the table saw, and this would, in theory, help fix the whole assembly in place. But, as long as I was re-aligning the fence, I figured I'd do a better job of it than the factory had this time. There are also a series of counter-sunk holes in the bracket, which most likely correspond to a number of other table saw models. In this case, they didn't line up with any previously existing holes... all I had to work with were the two big sloppy ones. So once the fence was as well-aligned as I wanted it, I pulled out a box of transfer punches, and I marked the edge of the cast iron table for drilling and tapping. The fence is now held on, and held in alignment by two large bolts, as well as four 1/4-20 countersunk screws. In the future, I plan on doing something similar to the router table, but I want to swap it out with the other one first.

Some people I know would be aghast, and mildly outraged that the factory hadn't already done all of this. I'm not. I understand that the factory has a price-point to meet, and that this particular fence is actually optional equipment, and not what would normally come with the saw. As equipped, the factory did provide me with everything I needed to put together a functioning, usable saw. In this case, I felt that my own modifications would add a little bit in the way of fit and finish to the saw... and the fence does slide a lot more easily now that it's re-aligned.

This is one of my concerns with an emphasis on optimization and efficiency, I think. The pursuit of efficiency is essentially an ongoing process of trying to find quicker or cheaper ways to manufacture something that's still good enough. What that means is that once the process is dialed in to make something that's really well made, a more efficient process that saves the company money will generally be found by cutting corners, or compromising standards. In this case, it's a hell of a lot easier to drill two sloppy holes and let the end user align everything during the assembly process than it is to lay things out precisely and give it that custom fit. Sloppy adjustable holes will pass QC a lot more easily than a table saw where one of the holes was a little bit off. But the reason I bothered to drill and tap in this case is to make the whole unit non-adjustable. I don't like adjustable fit. I have some miter gauge heads that are also adjustable to get them precisely to 90 degrees... or back to 90. But the end result is that they can be knocked out of square pretty easily, and they become unreliable.

It's not that these things can't be made to work. It just means more effort is required on my part to make it happen.

Monday, January 10, 2011

Still in process... and purging what's necessary.

The holidays were not as productive as I'd wished. It's not really surprising, but beyond rationality, I thought I'd get more work done. I got one small bookcase built, and I'm working on a pile more, to stack up and around a doorway for a client. More pictures as they come in.

I also have spent some time in the shop tweaking and tuning things. Since the wall went up and we lost all of our fabulous free space, it's been a slow but steady process of re-appraising...

I threw out two router tables that I'd designed and made out of a sheet of plywood a few years ago when I was teaching classes at my local woodcraft. I designed them to be cheaply built, with minimal hardware. There's a pivot bolt holding one side of the fence down. The other side moves along the radiused side of the table, and gets fixed in place with a toggle clamp. So, aside from the router and router plate, (Which I guess is optional,) all you really need is a bolt and a toggle clamp to make it work. There's also dust collection, which is nice. Well, I haven't used them in years, so I was going to throw them out. They got scooped up by a woodshop teacher, since it's easier to have the kids rotate between tables, than it is to have them continue to change bits. That was the logic when I built them, it's nice to see that someone still finds them useful.

Most recently, I chopped a big chunk off of the platform that held my contractor's table saw. There's a picture of the unit here, which doesn't really tell the whole story. The big plywood box was something close to 40" from front to back, and 54" wide, I think, and around 32" tall or a little more. The table saw is only 27" front to back... I'd added an outfeed table, and fitted drawers underneath it. There are also 2 router tables built in, and dust collection ductwork inside, that connects to the saw, and to the router tables. In theory, it was going to be a do-it-all kind of work station. A double headed router table for doing stile and rail stuff, and a table saw in the middle for doing... whatever I needed it to do... dust collection to keep the shop clean, it was all so well intentioned.

Well, that was the theory. Ariel Asked me when I decided to built this monstrosity back in 2007 if I really thought I needed it. She knows me well enough to know when I'm spinning off on a goofy project. I thought it would be a great work-station, with enough drawers and storage to hold all the table saw stuff and router table stuff I'd ever have. And it did have incredibly adequate storage space... but the unit as a whole was enormous, ponderous to wheel around, and the dust collection, quite frankly, sucked. Because it was all connected, there were too many open holes moving air for any of the 3 openings to be working well. For the last year or two, it's been in the back corner of the shop, and one of the router tables was being used with a fancy-pants fence that covered up the saw and the other router table. So, really, it was a huge waste of space for holding just one measly router table... even if it is a nice router table.

So, since it was too big, mostly useless, and taking up space in the shop that's now smaller, I gave it a chop-job. I removed one of the router tables, which will get built into a separate unit with the fancy pants fence. The other router table remains on the saw, and the base is no bigger than the saw... front to back, it's now 27". This is the chunk that was removed, ductwork and all... (ductwork is on the other side, but it's still there, trust me) sitting in front of the dumpster that's filled with a lot of the other stuff that's been tossed out.

And this afternoon, before going home, I rolled it all down to the loading dock, to be emptied tomorrow morning.


Slowly but surely, we're reclaiming space to get work done. And I'm getting actual work done. Go figure.