Friday, February 15, 2013

Just a quick vent...

I've had an interesting time lately, trying to ingest the current 'industrial' design trend. It seems like everywhere I turn, someone has turned a useful tool into a decoration. Shop carts made into thousand dollar coffee tables, clamps into coat racks, and viable industrial space into lofts and apartments.

I'm sure there's a larger point to be made, and I'll get around to making it someday, but I think that the reason it bothers me so much is that I feel like these people have no appreciation for manufacturing or industry. The equivalent in modern work equipment might be to make things out of last year's useful items.. but who really wants a coffee table made out of old desktop PC towers, cash registers, and coffee house grinders?

At the end of the day, the two main things that are up for sale if you want to make a living are goods or services. And goods must be manufactured by people who know how, in spaces that are appropriate for that task. But it's as if the designers took a look at outsourcing, looked around at all of the remaining potential, and thought to themselves, "Well, they won't be using this anymore... let's turn it into something cute!"

If manufacturing is (was?) one of the things that made this country great, then isn't the process of turning productive spaces and equipment into trendy fluff a little bit like eating the seed corn?

This has been more and more of an issue for me as I begin to look to the future, and to think about moving into a different space. So many perfectly good industrial buildings have been chopped up and repackaged as 6- and 7- figure condos for 'modern living.' Buildings built to last the test of time, now re-furbished with the latest and greatest of almost-disposable appliances. I'm not sure why it just rubs me the wrong way, but it does.

Sunday, February 10, 2013

Converting a Skew Rabbet Plane to a Dovetail Plane, Part 5


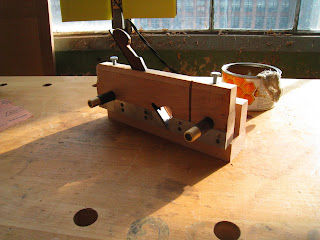
For the nicker, I had to do some head scratching. Vintage models use a wedge to hold nickers in place, but I didn't feel like fitting a wedge. And, the alignment issue was also on my mind. What I finally decided on was a pair of hex-key set screws. One comes through from the other side of the body of the plane, just at the bit of the nicker. The other is about 3/32" above it, tapped into the metal plate on the side of the plane. The lower screw allows me to align the bit with the side of the plane. The screw through the plate clamps the nicker in place.

The blade required some fine tuning at the wet grinder to get the angle just right, but it sharpened up just fine. After that, I put everything together and made a few test passes.

When I resoled the plane originally, I made a very tight mouth and throat. But because the shavings are cross-grain, they break off pretty easily, and not only is the support of a tight mouth not really needed, but it jams up pretty quickly. So, I opened it up. Because the blade is basically plowing out material, and not leaving a final surface, I'm ok with this. (I'm more worried with keeping the shavings flowing, than how finely they're being cut... this is intended to be a production too, despite the fussiness I've been putting into it.)

After that... well, that's pretty much it. I made a few more test passes with the plane, and it worked like I'd hoped. So, I gave it a good coat of wax, and played around with it for a while. Next week I'll get to put this tool to work.


Read Part One.
Read Part Two.
Read Part Three. 
Read Part Four.
The Plane In Use.

Saturday, February 9, 2013

Snowed in!

My first born should be arriving any day now. So, needless to say, getting the car shoveled out was a big priority. But as the plows kept renewing the wall at the end my driveway, my back started to complain.

By now, I'm used to hearing about and learning about more efficient but almost-forgotten ways to work wood by hand, some of which are as fast or faster than power tools. So I found myself wondering if there was some similar, ingenious, but long lost technique to help clear the snow out of the way.

Then I remembered that they simply used snow shoes and sleighs instead.

Crap.

Friday, February 8, 2013

Converting a Skew Rabbet Plane to a Dovetail Plane, part 4


There are two basic functions that are critical to the proper operation of this plane. The fence needs to guide the cut, and the plane needs to make the cut.

The fence must reliably reference off of the end of the board. A lot of the most obvious work to date has been to accomplish this. The last remaining piece required to make this work is to drill holes in the body of the plane to install some wooden pieces to clamp against the arms of the fence, and some brass inserts, to allow the thumbscrews to drive those wooden pieces down. I used a dowel centering jig, some long brad point bits, and some stop collars to accomplish this.


The cut will be made in two steps: The nicker will score the wood ahead of the blade, establishing the shoulder, and the blade will plow out the waste. To do this properly, the nicker needs to be aligned with the side of the plane, the blade also needs to conform to the shape of the body, and the throat needs to allow the waste to clear. The nicker will be covered in the next entry.

To shape the blade, I needed to know where the edges needed to be. Because the sole used to be square, and because the sides of the plaen used to be wider, there was a lot of shaping that needed to be done. I coated the back with black magic marker, and scribed with an iron from a block plane. I used an 8" slow speed bench grinder to get close to the line, and finished up with a wet grinder. I started with the bench grinder because it's fast. I switched to the wet grinder because the blade comes to a point, and I didn't want to burn the temper out of the blade.


Thursday, February 7, 2013

Quick shop tip: saving dust

Using wood dust to fill gaps, voids, etc, is a pretty old trick. But brushes, etc, don't always do such a great job of collecting the really fine stuff.

I found that using a small pad of post-its as a sort of dust squeegee does a much better job.


Converting a Skew Rabbet plane to a dovetail plane Pt 3: New nicker


Because the plane is designed to go cross-grain, it needs a nicker.

Because I didn't have one, I needed to make one.

I spent the better part of half a day cutting and filing this particular bit out of a piece of O-1 tool steel that I had kicking around in a drawer somewhere.

(Yes, I happened to have tool steel kicking around in a drawer. I'm aware that this is possibly not typical behavior. I live with it.)

At that point, I had to dig out my notes from a class that I took with Larry Williams back in 2005, covering heat treatment.

I used a (borrowed, but they're not too expensive) Mapp gas torch to heat treat the bit on the nicker. I also found out the hard way that there's a reason to do this on fire brick, as opposed to bare concrete.

Anyway, the notes say, heat the tang to black. Then heat the bevel side of the bit to cherry red, flip over, continue to heat until spots of flux appear on the surface of the steel. Then quench in oil, stirring the oil with the steel for about a minute or so, holding the piece vertical, to avoid warping.

After that, the steel is hard, but brittle. So, the next step is to temper the blade by baking at 350 for at least an hour. That should soften it up enough to make it usable.

So... yeah. I made a heat treated blade for my dovetail plane. There's a little bit of the beginner in me that's squealing in delight. It may not be a major accomplishment on the grand scale. But it's not something most folks get to do every day, either.

Read Part 1.
Read Part 2.
Read Part 4. 
Read Part 5.  
The Plane In Use.